原文 https://blog.csdn.net/u012124438/article/details/70990816
init進程是Android系統中用戶空間的第一個進程,它被賦予了很多極其重要的工作職責,init進程相關源碼位於system/core/init,本篇博客我們就一起來學習init進程(基於Android 7.0 )。
init入口函數分析
init的入口函數為main,位於system/core/init/init.cpp
int main(int argc, char** argv) {
if (!strcmp(basename(argv[0]), "ueventd")) {
return ueventd_main(argc, argv);
}
if (!strcmp(basename(argv[0]), "watchdogd")) {
return watchdogd_main(argc, argv);
}
umask(0);
add_environment("PATH", _PATH_DEFPATH);
bool is_first_stage = (argc == 1) || (strcmp(argv[1], "--second-stage") != 0);
if (is_first_stage) {
mount("tmpfs", "/dev", "tmpfs", MS_NOSUID, "mode=0755");
mkdir("/dev/pts", 0755);
mkdir("/dev/socket", 0755);
mount("devpts", "/dev/pts", "devpts", 0, NULL);
#define MAKE_STR(x) __STRING(x)
mount("proc", "/proc", "proc", 0, "hidepid=2,gid=" MAKE_STR(AID_READPROC));
mount("sysfs", "/sys", "sysfs", 0, NULL);
}
open_devnull_stdio();
3.初始化内核log系统
klog_init();
klog_set_level(KLOG_NOTICE_LEVEL);
NOTICE("init %s started!\n", is_first_stage ? "first stage" : "second stage");
if (!is_first_stage) {
close(open("/dev/.booting", O_WRONLY | O_CREAT | O_CLOEXEC, 0000));
property_init();
process_kernel_dt();
process_kernel_cmdline();
export_kernel_boot_props();
}
5.完成SELinux相关工作
selinux_initialize(is_first_stage);
if (is_first_stage) {
6.重新设置属性
if (restorecon("/init") == -1) {
ERROR("restorecon failed: %s\n", strerror(errno));
security_failure();
}
char* path = argv[0];
char* args[] = { path, const_cast<char*>("--second-stage"), nullptr };
if (execv(path, args) == -1) {
ERROR("execv(\"%s\") failed: %s\n", path, strerror(errno));
security_failure();
}
}
NOTICE("Running restorecon...\n");
restorecon("/dev");
restorecon("/dev/socket");
restorecon("/dev/__properties__");
restorecon("/property_contexts");
restorecon_recursive("/sys");
7.创建epoll句柄
epoll_fd = epoll_create1(EPOLL_CLOEXEC);
if (epoll_fd == -1) {
ERROR("epoll_create1 failed: %s\n", strerror(errno));
exit(1);
}
8.装载子进程信号处理器
signal_handler_init();
property_load_boot_defaults();
export_oem_lock_status();
start_property_service();
const BuiltinFunctionMap function_map;
Action::set_function_map(&function_map);
Parser& parser = Parser::GetInstance();
parser.AddSectionParser("service",std::make_unique());
parser.AddSectionParser("on", std::make_unique());
parser.AddSectionParser("import", std::make_unique());
parser.ParseConfig("/init.rc");
ActionManager& am = ActionManager::GetInstance();
am.QueueEventTrigger("early-init");
am.QueueBuiltinAction(wait_for_coldboot_done_action, "wait_for_coldboot_done");
am.QueueBuiltinAction(mix_hwrng_into_linux_rng_action, "mix_hwrng_into_linux_rng");
am.QueueBuiltinAction(set_mmap_rnd_bits_action, "set_mmap_rnd_bits");
am.QueueBuiltinAction(keychord_init_action, "keychord_init");
am.QueueBuiltinAction(console_init_action, "console_init");
am.QueueEventTrigger("init");
am.QueueBuiltinAction(mix_hwrng_into_linux_rng_action, "mix_hwrng_into_linux_rng");
std::string bootmode = property_get("ro.bootmode");
if (bootmode == "charger") {
am.QueueEventTrigger("charger");
} else {
am.QueueEventTrigger("late-init");
}
am.QueueBuiltinAction(queue_property_triggers_action, "queue_property_triggers");
while (true) {
if (!waiting_for_exec) {
am.ExecuteOneCommand();
restart_processes();
}
int timeout = -1;
if (process_needs_restart) {
timeout = (process_needs_restart - gettime()) * 1000;
if (timeout < 0)
timeout = 0;
}
if (am.HasMoreCommands()) {
timeout = 0;
}
bootchart_sample(&timeout);
epoll_event ev;
int nr = TEMP_FAILURE_RETRY(epoll_wait(epoll_fd, &ev, 1, timeout));
if (nr == -1) {
ERROR("epoll_wait failed: %s\n", strerror(errno));
} else if (nr == 1) {
((void (*)()) ev.data.ptr)();
}
}
return 0;
}
- 1
- 2
- 3
- 4
- 5
- 6
- 7
- 8
- 9
- 10
- 11
- 12
- 13
- 14
- 15
- 16
- 17
- 18
- 19
- 20
- 21
- 22
- 23
- 24
- 25
- 26
- 27
- 28
- 29
- 30
- 31
- 32
- 33
- 34
- 35
- 36
- 37
- 38
- 39
- 40
- 41
- 42
- 43
- 44
- 45
- 46
- 47
- 48
- 49
- 50
- 51
- 52
- 53
- 54
- 55
- 56
- 57
- 58
- 59
- 60
- 61
- 62
- 63
- 64
- 65
- 66
- 67
- 68
- 69
- 70
- 71
- 72
- 73
- 74
- 75
- 76
- 77
- 78
- 79
- 80
- 81
- 82
- 83
- 84
- 85
- 86
- 87
- 88
- 89
- 90
- 91
- 92
- 93
- 94
- 95
- 96
- 97
- 98
- 99
- 100
- 101
- 102
- 103
- 104
- 105
- 106
- 107
- 108
- 109
- 110
- 111
- 112
- 113
- 114
- 115
- 116
- 117
- 118
- 119
- 120
- 121
- 122
- 123
- 124
- 125
- 126
- 127
- 128
- 129
- 130
- 131
- 132
- 133
- 134
- 135
- 136
- 137
- 138
- 139
- 140
- 141
- 142
- 143
- 144
- 145
- 146
- 147
- 148
- 149
- 150
- 151
- 152
- 153
- 154
- 155
- 156
- 157
- 158
- 159
- 160
- 161
- 162
- 163
- 164
- 165
- 166
- 167
- 168
- 169
- 170
- 171
從上面代碼中可以精簡歸納init的main方法做的事情:
1.創建文件系統目錄並掛載相關的文件系統
2.屏蔽標準的輸入輸出
3.初始化內核log系統
4.調用property_init初始化屬性相關的資源
5.完成SELinux相關工作
6.重新設置屬性
7.創建epoll句柄
8.裝載子進程信號處理器
9.通過property_start_service啟動屬性服務
10.通過parser.ParseConfig(“/init.rc”)來解析init.rc
接下來對上述部分步驟,進行詳細解析。
1.創建文件系統目錄並掛載相關的文件系統
umask(0);
add_environment("PATH", _PATH_DEFPATH);
bool is_first_stage = (argc == 1) || (strcmp(argv[1], "--second-stage") != 0);
if (is_first_stage) {
mount("tmpfs", "/dev", "tmpfs", MS_NOSUID, "mode=0755");
mkdir("/dev/pts", 0755);
mkdir("/dev/socket", 0755);
mount("devpts", "/dev/pts", "devpts", 0, NULL);
#define MAKE_STR(x) __STRING(x)
mount("proc", "/proc", "proc", 0, "hidepid=2,gid=" MAKE_STR(AID_READPROC));
mount("sysfs", "/sys", "sysfs", 0, NULL);
}
- 1
- 2
- 3
- 4
- 5
- 6
- 7
- 8
- 9
- 10
- 11
- 12
- 13
- 14
- 15
- 16
- 17
該部分主要用於創建和掛載啟動所需的文件目錄。
需要注意的是,在編譯Android系統源碼時,在生成的根文件系統中,並不存在這些目錄,它們是系統運行時的目錄,即當系統終止時,就會消失。
在init初始化過程中,Android分別掛載了tmpfs,devpts,proc,sysfs這4類文件系統。
2.屏蔽標準的輸入輸出
open_devnull_stdio();
前文生成/dev目錄後,init進程將調用open_devnull_stdio函數,屏蔽標準的輸入輸出。
open_devnull_stdio函數會在/dev目錄下生成null設備節點文件,並將標準輸入、標準輸出、標準錯誤輸出全部重定向到null設備中。
void open_devnull_stdio(void)
{
int fd = open("/sys/fs/selinux/null", O_RDWR);
if (fd == -1) {
static const char *name = "/dev/__null__";
if (mknod(name, S_IFCHR | 0600, (1 << 8) | 3) == 0) {
fd = open(name, O_RDWR);
unlink(name);
}
if (fd == -1) {
exit(1);
}
}
dup2(fd, 0);
dup2(fd, 1);
dup2(fd, 2);
if (fd > 2) {
close(fd);
}
}
- 1
- 2
- 3
- 4
- 5
- 6
- 7
- 8
- 9
- 10
- 11
- 12
- 13
- 14
- 15
- 16
- 17
- 18
- 19
- 20
- 21
- 22
- 23
- 24
- 25
open_devnull_stdio函數定義於system/core/init/util.cpp中。
這裡需要說明的是,dup2函數的作用是用來複製一個文件的描述符,通常用來重定向進程的stdin、stdout和stderr。它的函數原形是:
int dup2(int oldfd,int targetfd)
該函數執行後,targetfd將變成oldfd的複製品。
因此上述過程其實就是:創建出null設備後,將0、1、2綁定到null設備上。因此init進程調用open_devnull_stdio函數後,通過標準的輸入輸出無法輸出信息。
4.初始化屬性域
if (!is_first_stage) {
    .......
    property_init();
    .......
}
調用property_init初始化屬性域。在Android平台中,為了讓運行中的所有進程共享系統運行時所需要的各種設置值,系統開闢了屬性存儲區域,並提供了訪問該區域的API。
需要強調的是,在init進程中有部分代碼塊以is_first_stage標誌進行區分,決定是否需要進行初始化,而is_first_stage的值,由init進程main函數的入口參數決定。其原因在於,在引入selinux機制後,有些操作必須要在內核態才能完成;
但init進程作為android的第一個進程,又是運行在用戶態的。
於是,最終設計為用is_first_stage進行區分init進程的運行狀態。init進程在運行的過程中,會完成從內核態到用戶態的切換。
void property_init() {
    if (__system_property_area_init()) {
        ERROR("Failed to initialize property area\n");
        exit(1);
    }
}
property_init函數定義於system/core/init/property_service.cpp中,如上面代碼所示,最終調用_system_property_area_init函數初始化屬性域。
5.完成SELinux相關工作
// Set up SELinux, including loading the SELinux policy if we're in the kernel domain.
selinux_initialize(is_first_stage);
init進程進程調用selinux_initialize啟動SELinux。從註釋來看,init進程的運行確實是區分用戶態和內核態的。
static void selinux_initialize(bool in_kernel_domain) {
Timer t;
selinux_callback cb;
cb.func_log = selinux_klog_callback;
selinux_set_callback(SELINUX_CB_LOG, cb);
cb.func_audit = audit_callback;
selinux_set_callback(SELINUX_CB_AUDIT, cb);
if (in_kernel_domain) {
INFO("Loading SELinux policy...\n");
if (selinux_android_load_policy() < 0) {
ERROR("failed to load policy: %s\n", strerror(errno));
security_failure();
}
bool kernel_enforcing = (security_getenforce() == 1);
bool is_enforcing = selinux_is_enforcing();
if (kernel_enforcing != is_enforcing) {
if(security_setenforce(is_enforcing)) {
........
security_failure();
}
}
if (write_file("/sys/fs/selinux/checkreqprot", "0") == -1) {
security_failure();
}
NOTICE("(Initializing SELinux %s took %.2fs.)\n",
is_enforcing ? "enforcing" : "non-enforcing", t.duration());
} else {
selinux_init_all_handles();
}
}
- 1
- 2
- 3
- 4
- 5
- 6
- 7
- 8
- 9
- 10
- 11
- 12
- 13
- 14
- 15
- 16
- 17
- 18
- 19
- 20
- 21
- 22
- 23
- 24
- 25
- 26
- 27
- 28
- 29
- 30
- 31
- 32
- 33
- 34
- 35
- 36
- 37
- 38
- 39
- 40
- 41
- 42
- 43
6.重新設置屬性
if (is_first_stage) {
if (restorecon("/init") == -1) {
ERROR("restorecon failed: %s\n", strerror(errno));
security_failure();
}
char* path = argv[0];
char* args[] = { path, const_cast<char*>("--second-stage"), nullptr };
if (execv(path, args) == -1) {
ERROR("execv(\"%s\") failed: %s\n", path, strerror(errno));
security_failure();
}
}
INFO("Running restorecon...\n");
restorecon("/dev");
restorecon("/dev/socket");
restorecon("/dev/__properties__");
restorecon_recursive("/sys");
- 1
- 2
- 3
- 4
- 5
- 6
- 7
- 8
- 9
- 10
- 11
- 12
- 13
- 14
- 15
- 16
- 17
- 18
- 19
- 20
- 21
- 22
- 23
- 24
上述文件節點在加載Sepolicy之前已經被創建了,因此在加載完Sepolicy後,需要重新設置相關的屬性。
9.啟動配置屬性的服務端
start_property_service();
init進程在共享內存區域中,創建並初始化屬性域。其它進程可以訪問屬性域中的值,但更改屬性值僅能在init進程中進行。這就是init進程調用start_property_service的原因。其它進程修改屬性值時,要預先向init進程提交值變更申請,然後init進程處理該申請,並修改屬性值。在訪問和修改屬性時,init進程都可以進行權限控制。
void start_property_service() {
    //创建了一个非阻塞socket
    property_set_fd = create_socket(PROP_SERVICE_NAME, SOCK_STREAM | SOCK_CLOEXEC | SOCK_NONBLOCK, 0666, 0, 0, NULL);
    if (property_set_fd == -1) {
        ERROR("start_property_service socket creation failed: %s\n", strerror(errno));
        exit(1);
    }
    //调用listen函数监听property_set_fd, 于是该socket变成一个server
    listen(property_set_fd, 8);
    //监听server socket上是否有数据到来
    register_epoll_handler(property_set_fd,  handle_property_set_fd);
}
- 1
- 2
- 3
- 4
- 5
- 6
- 7
- 8
- 9
- 10
- 11
- 12
我們知道,在create_socket函數返回套接字property_set_fd時,property_set_fd是一個主動連接的套接字。此時,系統假設用戶會對這個套接字調用connect函數,期待它主動與其它進程連接。
由於在服務器編程中,用戶希望這個套接字可以接受外來的連接請求,也就是被動等待用戶來連接,於是需要調用listen函數使用主動連接套接字變為被連接套接字,使得一個進程可以接受其它進程的請求,從而成為一個服務器進程。
因此,調用listen後,init進程成為一個服務進程,其它進程可以通過property_set_fd連接init進程,提交設置系統屬性的申請。
listen函數的第二個參數,涉及到一些網絡的細節。
在進程處理一個連接請求的時候,可能還存在其它的連接請求。因為TCP連接是一個過程,所以可能存在一種半連接的狀態。有時由於同時嘗試連接的用戶過多,使得服務器進程無法快速地完成連接請求。
因此,內核會在自己的進程空間里維護一個隊列,以跟踪那些已完成連接但服務器進程還沒有接手處理的用戶,或正在進行的連接的用戶。這樣的一個隊列不可能任意大,所以必須有一個上限。listen的第二個參數就是告訴內核使用這個數值作為上限。因此,init進程作為系統屬性設置的服務器,最多可以同時為8個試圖設置屬性的用戶提供服務。
在啟動配置屬性服務的最後,調用函數register_epoll_handler。該函數將利用之前創建出的epoll句柄監聽property_set_fd。當property_set_fd中有數據到來時,init進程將利用handle_property_set_fd函數進行處理。
static void handle_property_set_fd() {
    ..........
    if ((s = accept(property_set_fd, (struct sockaddr *) &addr, &addr_size)) < 0) {
        return;
    }
    ........
    r = TEMP_FAILURE_RETRY(recv(s, &msg, sizeof(msg), MSG_DONTWAIT));
    .........
    switch(msg.cmd) {
    .........
    }
    .........
}
- 1
- 2
- 3
- 4
- 5
- 6
- 7
- 8
- 9
- 10
- 11
- 12
- 13
handle_propery_set_fd函數實際上是調用accept函數監聽連接請求,接收property_set_fd中到來的數據,然後利用recv函數接受到來的數據,最後根據到來數據的類型,進行設置系統屬性等相關操作,在此不做深入分析。
介紹一下系統屬性改變的一些用途。
在init.rc中定義了一些與屬性相關的觸發器。當某個條件相關的屬性被改變時,與該條件相關的觸發器就會被觸發。舉例來說,如下面代碼所示,debuggable屬性變為1時,將執行啟動console進程等操作。
on property:ro.debuggable=1
    # Give writes to anyone for the trace folder on debug builds.
    # The folder is used to store method traces.
    chmod 0773 /data/misc/trace
    start console
總結一下,其它進程修改系統屬性時,大致的流程如下圖所示:其它的進程像init進程發送請求後,由init進程檢查權限後,修改共享內存區。 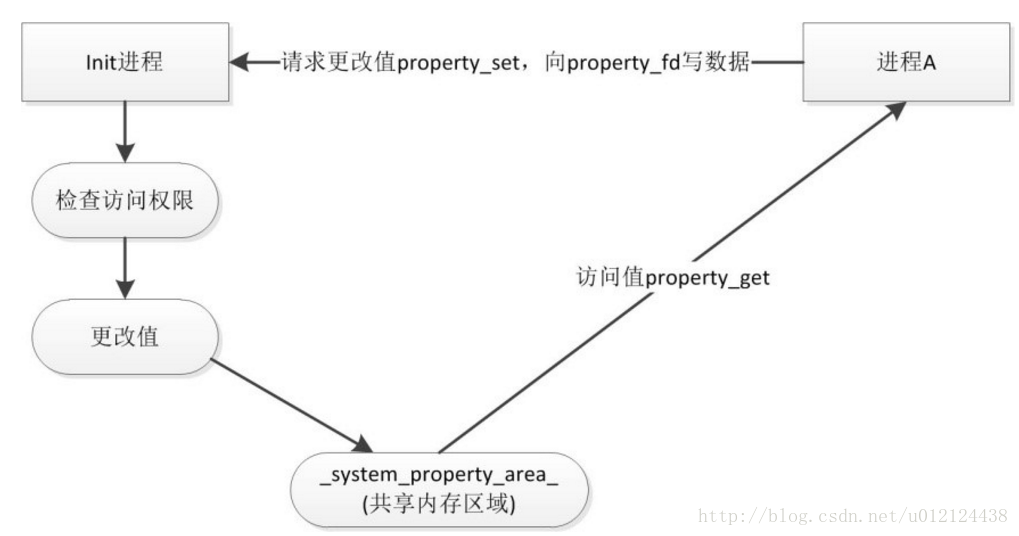
10.解析配置文件init.rc
init.rc是系統配置文件,位於system/core/rootdir/init.rc,Android 7.0中對init.rc文件進行了拆分,每個服務一個rc文件。
init.rc文件是在init進程啟動後執行的啟動腳本,文件中記錄著init進程需執行的操作。在Android系統中,使用init.rc和init.{ hardware }.rc兩個文件。
其中init.rc文件在Android系統運行過程中用於通用的環境設置與進程相關的定義,init.{hardware}.rc(例如,高通有init.qcom.rc,MTK有init.mediatek.rc)用於定義Android在不同平台下的特定進程和環境設置等。
init.rc文件大致分為兩大部分,一部分是以“on”關鍵字開頭的動作列表(action list):
on early-init
write /proc/1/oom_score_adj -1000
.........
start ueventd
另一部分是以“service”關鍵字開頭的服務列表(service list):
service ueventd /sbin/ueventd
    class core
    critical
    seclabel u:r:ueventd:s0
動作列表用於創建所需目錄,以及為某些特定文件指定權限,而服務列表用來記錄init進程需要啟動的一些子進程。如上面代碼所示,service關鍵字後的第一個字符串表示服務(子進程)的名稱,第二個字符串表示服務的執行路徑。
接下來,我們從ParseConfig函數入手,逐步分析整個解析過程(函數定義於system/core/init/ Init_parser.cpp中):
bool Parser::ParseConfig(const std::string& path) {
if (is_dir(path.c_str())) {
return ParseConfigDir(path);
}
return ParseConfigFile(path);
}
bool Parser::ParseConfigDir(const std::string& path) {
...........
std::unique_ptr<DIR, int(*)(DIR*)> config_dir(opendir(path.c_str()), closedir);
..........
while ((current_file = readdir(config_dir.get()))) {
std::string current_path = android::base::StringPrintf("%s/%s", path.c_str(), current_file->d_name);
if (current_file->d_type == DT_REG) {
if (!ParseConfigFile(current_path)) {
.............
}
}
}
}
- 1
- 2
- 3
- 4
- 5
- 6
- 7
- 8
- 9
- 10
- 11
- 12
- 13
- 14
- 15
從上面的代碼可以看出,解析init.rc文件的函數是ParseConfigFile:
bool Parser::ParseConfigFile(const std::string& path) {
INFO("Parsing file %s...\n", path.c_str());
Timer t;
std::string data;
if (!read_file(path.c_str(), &data)) {
return false;
}
data.push_back('\n');
ParseData(path, data);
for (const auto& sp : section_parsers_) {
sp.second->EndFile(path);
}
if (false) DumpState();
NOTICE("(Parsing %s took %.2fs.)\n", path.c_str(), t.duration());
return true;
}
- 1
- 2
- 3
- 4
- 5
- 6
- 7
- 8
- 9
- 10
- 11
- 12
- 13
- 14
- 15
- 16
- 17
- 18
- 19
- 20
- 21
- 22
- 23
ParseData函數定義於system/core/init/init_parser.cpp中,根據關鍵字解析出服務和動作。動作與服務會以鍊錶節點的形式註冊到service_list與action_list中,service_list與action_list是init進程中聲明的全局結構體
void Parser::ParseData(const std::string& filename, const std::string& data) {
.......
parse_state state;
.......
std::vector<std::string> args;
for (;;) {
switch (next_token(&state)) {
case T_EOF:
if (section_parser) {
section_parser->EndSection();
}
return;
case T_NEWLINE:
state.line++;
if (args.empty()) {
break;
}
if (section_parsers_.count(args[0])) {
if (section_parser) {
section_parser->EndSection();
}
section_parser = section_parsers_[args[0]].get();
std::string ret_err;
if (!section_parser->ParseSection(args, &ret_err)) {
parse_error(&state, "%s\n", ret_err.c_str());
section_parser = nullptr;
}
} else if (section_parser) {
std::string ret_err;
if (!section_parser->ParseLineSection(args, state.filename, state.line, &ret_err)) {
parse_error(&state, "%s\n", ret_err.c_str());
}
}
args.clear();
break;
case T_TEXT:
args.emplace_back(state.text);
break;
}
}
}
- 1
- 2
- 3
- 4
- 5
- 6
- 7
- 8
- 9
- 10
- 11
- 12
- 13
- 14
- 15
- 16
- 17
- 18
- 19
- 20
- 21
- 22
- 23
- 24
- 25
- 26
- 27
- 28
- 29
- 30
- 31
- 32
- 33
- 34
- 35
- 36
- 37
- 38
- 39
- 40
- 41
- 42
- 43
- 44
- 45
- 46
- 47
- 48
- 49
- 50
- 51
- 52
- 53
- 54
- 55
這裡的解析看起來比較複雜,在6.0以前的版本中,整個解析是面向過程的。init進程統一調用一個函數來進行解析,然後在該函數中利用switch-case的形式,根據解析的內容進行相應的處理。
在Android 7.0中,為了更好地封裝及面向對象,對於不同的關鍵字定義了不同的parser對象,每個對象通過多態實現自己的解析操作。
在init進程main函數中,創建各種parser的代碼如下:
...........
Parser& parser = Parser::GetInstance();
parser.AddSectionParser("service",std::make_unique());
parser.AddSectionParser("on", std::make_unique());
parser.AddSectionParser("import", std::make_unique());
...........
看看三個Parser的定義:
class ServiceParser : public SectionParser {......}
class ActionParser : public SectionParser {......}
class ImportParser : public SectionParser {.......}
可以看到三個Parser均是繼承SectionParser,具體的實現各有不同,我們以比較常用的ServiceParser和ActionParser為例
ServiceParser
ServiceParser定義於system/core/init/service.cpp中。從前面的代碼,我們知道,解析一個service塊,首先需要調用ParseSection函數,接著利用ParseLineSection處理子塊,解析完所有數據後,調用EndSection。
因此,我們著重看看ServiceParser的這三個函數:
bool ServiceParser::ParseSection(.....) {
.......
const std::string& name = args[1];
.......
std::vector<std::string> str_args(args.begin() + 2, args.end());
service_ = std::make_unique(name, "default", str_args);
return true;
}
bool ServiceParser::ParseLineSection(......) const {
return service_ ? service_->HandleLine(args, err) : false;
}
bool Service::HandleLine(.....) {
........
static const OptionHandlerMap handler_map;
auto handler = handler_map.FindFunction(args[0], args.size() - 1, err);
if (!handler) {
return false;
}
return (this->*handler)(args, err);
}
- 1
- 2
- 3
- 4
- 5
- 6
- 7
- 8
- 9
- 10
- 11
- 12
- 13
- 14
- 15
class Service::OptionHandlerMap : public KeywordMap<OptionHandler> {
    ...........
    Service::OptionHandlerMap::Map& Service::OptionHandlerMap::map() const {
    constexpr std::size_t kMax = std::numeric_limits<std::size_t>::max();
    static const Map option_handlers = {
        {"class",       {1,     1,    &Service::HandleClass}},
        {"console",     {0,     0,    &Service::HandleConsole}},
        {"critical",    {0,     0,    &Service::HandleCritical}},
        {"disabled",    {0,     0,    &Service::HandleDisabled}},
        {"group",       {1,     NR_SVC_SUPP_GIDS + 1, &Service::HandleGroup}},
        {"ioprio",      {2,     2,    &Service::HandleIoprio}},
        {"keycodes",    {1,     kMax, &Service::HandleKeycodes}},
        {"oneshot",     {0,     0,    &Service::HandleOneshot}},
        {"onrestart",   {1,     kMax, &Service::HandleOnrestart}},
        {"seclabel",    {1,     1,    &Service::HandleSeclabel}},
        {"setenv",      {2,     2,    &Service::HandleSetenv}},
        {"socket",      {3,     6,    &Service::HandleSocket}},
        {"user",        {1,     1,    &Service::HandleUser}},
        {"writepid",    {1,     kMax, &Service::HandleWritepid}},
    };
    return option_handlers;
}
- 1
- 2
- 3
- 4
- 5
- 6
- 7
- 8
- 9
- 10
- 11
- 12
- 13
- 14
- 15
- 16
- 17
- 18
- 19
- 20
- 21
- 22
- 23
bool Service::HandleClass(const std::vector<std::string>& args, std::string* err) {
classname_ = args[1];
return true;
}
void ServiceParser::EndSection() {
if (service_) {
ServiceManager::GetInstance().AddService(std::move(service_));
}
}
void ServiceManager::AddService(std::unique_ptr service) {
Service* old_service = FindServiceByName(service->name());
if (old_service) {
ERROR("ignored duplicate definition of service '%s'",
service->name().c_str());
return;
}
services_.emplace_back(std::move(service));
}
- 1
- 2
- 3
- 4
- 5
- 6
- 7
- 8
- 9
- 10
- 11
- 12
- 13
- 14
- 15
- 16
- 17
- 18
- 19
- 20
- 21
- 22
- 23
- 24
總結一下:ServiceParser中,首先根據第一行的名字和參數創建出service對象,然後根據選項域的內容填充service對象,最後將創建出的service對象加入到vector類型的service鍊錶中。
ActionParser
ActionParser定義於system/core/init/action.cpp中。Action的解析過程,其實與Service一樣,也是先後調用ParseSection, ParseLineSection和EndSection。
bool ActionParser::ParseSection(....) {
........
auto action = std::make_unique(false);
if (!action->InitTriggers(triggers, err)) {
return false;
}
.........
}
bool ActionParser::ParseLineSection(.......) const {
return action_ ? action_->AddCommand(args, filename, line, err) : false;
}
bool Action::AddCommand(.....) {
........
auto function = function_map_->FindFunction(args[0], args.size() - 1, err);
........
AddCommand(function, args, filename, line);
return true;
}
void Action::AddCommand(......) {
commands_.emplace_back(f, args, filename, line);
}
void ActionParser::EndSection() {
if (action_ && action_->NumCommands() > 0) {
ActionManager::GetInstance().AddAction(std::move(action_));
}
}
void ActionManager::AddAction(.....) {
........
auto old_action_it = std::find_if(actions_.begin(),
actions_.end(),
[&action] (std::unique_ptr& a) {
return action->TriggersEqual(*a);
});
if (old_action_it != actions_.end()) {
(*old_action_it)->CombineAction(*action);
} else {
actions_.emplace_back(std::move(action));
}
}
- 1
- 2
- 3
- 4
- 5
- 6
- 7
- 8
- 9
- 10
- 11
- 12
- 13
- 14
- 15
- 16
- 17
- 18
- 19
- 20
- 21
- 22
- 23
- 24
- 25
- 26
- 27
- 28
- 29
- 30
- 31
- 32
- 33
- 34
- 35
- 36
- 37
- 38
- 39
- 40
- 41
- 42
- 43
- 44
- 45
- 46
- 47
- 48
- 49
- 50
- 51
可以看出,加載action塊的邏輯和service一樣,不同的是需要填充trigger和command域。當然,最後解析出的action也需要加入到action鍊錶中。
這裡最後還剩下一個問題,那就是哪裡定義了Action中command對應處理函數?
答案就是在init.cpp的main函數中:
.......
const BuiltinFunctionMap function_map;
Action::set_function_map(&function_map);
.......
Action中調用function_map_->FindFunction時,實際上調用的是BuiltinFunctionMap的FindFunction函數。FindFunction是keyword定義的通用函數,重點是重構的map函數。所以需要看BuiltinFunctionMap,其定義在system/core/init/builtins.cpp:
BuiltinFunctionMap::Map& BuiltinFunctionMap::map() const {
    constexpr std::size_t kMax = std::numeric_limits::max();
    static const Map builtin_functions = {
        {"bootchart_init",          {0,     0,    do_bootchart_init}},
        {"chmod",                   {2,     2,    do_chmod}},
        {"chown",                   {2,     3,    do_chown}},
        {"class_reset",             {1,     1,    do_class_reset}},
        {"class_start",             {1,     1,    do_class_start}},
        {"class_stop",              {1,     1,    do_class_stop}},
        {"copy",                    {2,     2,    do_copy}},
        {"domainname",              {1,     1,    do_domainname}},
        {"enable",                  {1,     1,    do_enable}},
        {"exec",                    {1,     kMax, do_exec}},
        {"export",                  {2,     2,    do_export}},
        {"hostname",                {1,     1,    do_hostname}},
        {"ifup",                    {1,     1,    do_ifup}},
        {"init_user0",              {0,     0,    do_init_user0}},
        {"insmod",                  {1,     kMax, do_insmod}},
        {"installkey",              {1,     1,    do_installkey}},
        {"load_persist_props",      {0,     0,    do_load_persist_props}},
        {"load_system_props",       {0,     0,    do_load_system_props}},
        {"loglevel",                {1,     1,    do_loglevel}},
        {"mkdir",                   {1,     4,    do_mkdir}},
        {"mount_all",               {1,     kMax, do_mount_all}},
        {"mount",                   {3,     kMax, do_mount}},
        {"powerctl",                {1,     1,    do_powerctl}},
        {"restart",                 {1,     1,    do_restart}},
        {"restorecon",              {1,     kMax, do_restorecon}},
        {"restorecon_recursive",    {1,     kMax, do_restorecon_recursive}},
        {"rm",                      {1,     1,    do_rm}},
        {"rmdir",                   {1,     1,    do_rmdir}},
        {"setprop",                 {2,     2,    do_setprop}},
        {"setrlimit",               {3,     3,    do_setrlimit}},
        {"start",                   {1,     1,    do_start}},
        {"stop",                    {1,     1,    do_stop}},
        {"swapon_all",              {1,     1,    do_swapon_all}},
        {"symlink",                 {2,     2,    do_symlink}},
        {"sysclktz",                {1,     1,    do_sysclktz}},
        {"trigger",                 {1,     1,    do_trigger}},
        {"verity_load_state",       {0,     0,    do_verity_load_state}},
        {"verity_update_state",     {0,     0,    do_verity_update_state}},
        {"wait",                    {1,     2,    do_wait}},
        {"write",                   {2,     2,    do_write}},
    };
    return builtin_functions;
}
- 1
- 2
- 3
- 4
- 5
- 6
- 7
- 8
- 9
- 10
- 11
- 12
- 13
- 14
- 15
- 16
- 17
- 18
- 19
- 20
- 21
- 22
- 23
- 24
- 25
- 26
- 27
- 28
- 29
- 30
- 31
- 32
- 33
- 34
- 35
- 36
- 37
- 38
- 39
- 40
- 41
- 42
- 43
- 44
- 45
- 46
上述代碼的第四項就是Action每個command對應的執行函數。
11.向執行隊列中添加其它action
ActionManager& am = ActionManager::GetInstance();

am.QueueEventTrigger("early-init");

// Queue an action that waits for coldboot done so we know ueventd has set up all of /dev...
m.QueueBuiltinAction(wait_for_coldboot_done_action, "wait_for_coldboot_done");
// ... so that we can start queuing up actions that require stuff from /dev.
am.QueueBuiltinAction(mix_hwrng_into_linux_rng_action, "mix_hwrng_into_linux_rng");
am.QueueBuiltinAction(set_mmap_rnd_bits_action, "set_mmap_rnd_bits");
am.QueueBuiltinAction(keychord_init_action, "keychord_init");
am.QueueBuiltinAction(console_init_action, "console_init");

// Trigger all the boot actions to get us started.
am.QueueEventTrigger("init");

// Repeat mix_hwrng_into_linux_rng in case /dev/hw_random or /dev/random
// wasn't ready immediately after wait_for_coldboot_done
am.QueueBuiltinAction(mix_hwrng_into_linux_rng_action, "mix_hwrng_into_linux_rng");

// Don't mount filesystems or start core system services in charger mode.
std::string bootmode = property_get("ro.bootmode");
if (bootmode == "charger") {
    am.QueueEventTrigger("charger");
} else {
    am.QueueEventTrigger("late-init");
}

// Run all property triggers based on current state of the properties.
    am.QueueBuiltinAction(queue_property_triggers_action, "queue_property_triggers");
- 1
- 2
- 3
- 4
- 5
- 6
- 7
- 8
- 9
- 10
- 11
- 12
- 13
- 14
- 15
- 16
- 17
- 18
- 19
- 20
- 21
- 22
- 23
- 24
- 25
- 26
- 27
- 28
- 29
從上面的代碼可以看出,接下來init進程中調用了大量的QueueEventTrigger和QueueBuiltinAction函數。
void ActionManager::QueueEventTrigger(const std::string& trigger) {
    trigger_queue_.push(std::make_unique(trigger));
}
此處QueueEventTrigger函數就是利用參數構造EventTrigger,然後加入到trigger_queue_中。後續init進程處理trigger事件時,將會觸發相應的操作。根據前文的分析,我們知道實際上就是將action_list中,對應trigger與第一個參數匹配的action,加入到運行隊列action_queue中。
void ActionManager::QueueBuiltinAction(BuiltinFunction func, const std::string& name) {
auto action = std::make_unique(true);
std::vector<std::string> name_vector{name};
if (!action->InitSingleTrigger(name)) {
return;
}
action->AddCommand(func, name_vector);
trigger_queue_.push(std::make_unique(action.get()));
actions_.emplace_back(std::move(action));
}
- 1
- 2
- 3
- 4
- 5
- 6
- 7
- 8
- 9
- 10
- 11
- 12
- 13
- 14
- 15
- 16
QueueBuiltinAction函數中構造新的action加入到actions_中,第一個參數作為新建action攜帶cmd的執行函數;第二個參數既作為action的trigger name,也作為action攜帶cmd的參數。
12.處理添加到運行隊列的事件
while (true) {
if (!waiting_for_exec) {
am.ExecuteOneCommand();
restart_processes();
}
int timeout = -1;
if (process_needs_restart) {
timeout = (process_needs_restart - gettime()) * 1000;
if (timeout < 0)
timeout = 0;
}
if (am.HasMoreCommands()) {
timeout = 0;
}
bootchart_sample(&timeout);
epoll_event ev;
int nr = TEMP_FAILURE_RETRY(epoll_wait(epoll_fd, &ev, 1, timeout));
if (nr == -1) {
ERROR("epoll_wait failed: %s\n", strerror(errno));
} else if (nr == 1) {
((void (*)()) ev.data.ptr)();
}
}
- 1
- 2
- 3
- 4
- 5
- 6
- 7
- 8
- 9
- 10
- 11
- 12
- 13
- 14
- 15
- 16
- 17
- 18
- 19
- 20
- 21
- 22
- 23
- 24
- 25
- 26
- 27
- 28
- 29
- 30
- 31
- 32
- 33
- 34
- 35
- 36
- 37
init進程將所有需要操作的action加入運行隊列後, 進入無限循環過程,不斷處理運行隊列中的事件,同時進行重啟service等操作。
ExecuteOneCommand中的主要部分如下所示
void ActionManager::ExecuteOneCommand() {
while (current_executing_actions_.empty() && !trigger_queue_.empty()) {
for (const auto& action : actions_) {
if (trigger_queue_.front()->CheckTriggers(*action)) {
current_executing_actions_.emplace(action.get());
}
}
trigger_queue_.pop();
}
if (current_executing_actions_.empty()) {
return;
}
auto action = current_executing_actions_.front();
if (current_command_ == 0) {
std::string trigger_name = action->BuildTriggersString();
INFO("processing action (%s)\n", trigger_name.c_str());
}
action->ExecuteOneCommand(current_command_);
++current_command_;
if (current_command_ == action->NumCommands()) {
current_executing_actions_.pop();
current_command_ = 0;
if (action->oneshot()) {
auto eraser = [&action] (std::unique_ptr& a) {
return a.get() == action;
};
actions_.erase(std::remove_if(actions_.begin(), actions_.end(), eraser));
}
}
}
void Action::ExecuteCommand(const Command& command) const {
Timer t;
int result = command.InvokeFunc();
........
}
- 1
- 2
- 3
- 4
- 5
- 6
- 7
- 8
- 9
- 10
- 11
- 12
- 13
- 14
- 15
- 16
- 17
- 18
- 19
- 20
- 21
- 22
- 23
- 24
- 25
- 26
- 27
- 28
- 29
- 30
- 31
- 32
- 33
- 34
- 35
- 36
- 37
- 38
- 39
- 40
- 41
- 42
- 43
- 44
- 45
- 46
- 47
- 48
- 49
- 50
- 51
- 52
- 53
- 54
- 55
void Action::ExecuteCommand(const Command& command) const {
Timer t;
int result = command.InvokeFunc();
........
}
從代碼可以看出,當while循環不斷調用ExecuteOneCommand函數時,將按照trigger表的順序,依次取出action鍊錶中與trigger匹配的action。
每次均執行一個action中的一個command對應函數(一個action可能攜帶多個command)。
當一個action所有的command均執行完畢後,再執行下一個action。
當一個trigger對應的action均執行完畢後,再執行下一個trigger對應action。
restart_processes函數負責按需重啟service
static void restart_processes() {
    process_needs_restart = 0;
    ServiceManager::GetInstance().ForEachServiceWithFlags(
        SVC_RESTARTING,
        [] (Service* s) {
            s->RestartIfNeeded(process_needs_restart);
        });
}
該函數輪詢service對應的鍊錶,對於有SVC_RESTARING標誌的service執行RestartIfNeeded(當子進程終止時,init進程會將可被重啟進程的服務標誌位置為SVC_RESTARTING)。
RestartIfNeeded可以重新啟動服務。
void Service::RestartIfNeeded(time_t& process_needs_restart)(struct service *svc)
{
time_t next_start_time = svc->time_started + 5;
if (next_start_time <= gettime()) {
svc->flags &= (~SVC_RESTARTING);
Start(svc, NULL);
return;
}
if ((next_start_time < process_needs_restart) ||
(process_needs_restart == 0)) {
process_needs_restart = next_start_time;
}
}
- 1
- 2
- 3
- 4
- 5
- 6
- 7
- 8
- 9
- 10
- 11
- 12
- 13
- 14
- 15
- 16
- 17
- 18
- 19
Bootchart 是一個能對GNU/Linux boot 過程進行性能分析並把結果直觀化的工具。它在boot 過程中蒐集資源利用情況及進程信息然後以PNG, SVG或EPS格式來顯示結果。BootChart 包含數據收集工具和圖像產生工具。數據收集工具在原始的BootChart中是獨立的shell程序,但在Android中,數據收集工具被集成到了init 程序中。


